Table of Contents
Aurelia is a playable Psyche character in Neverness to Everness and a member of NTE. She transforms the everyday into a rainbow melody, commanding jellyfish to perform devastating synchronized attacks. This guide covers the best build for Aurelia in Neverness to Everness, including his skills, gear, and team compositions.
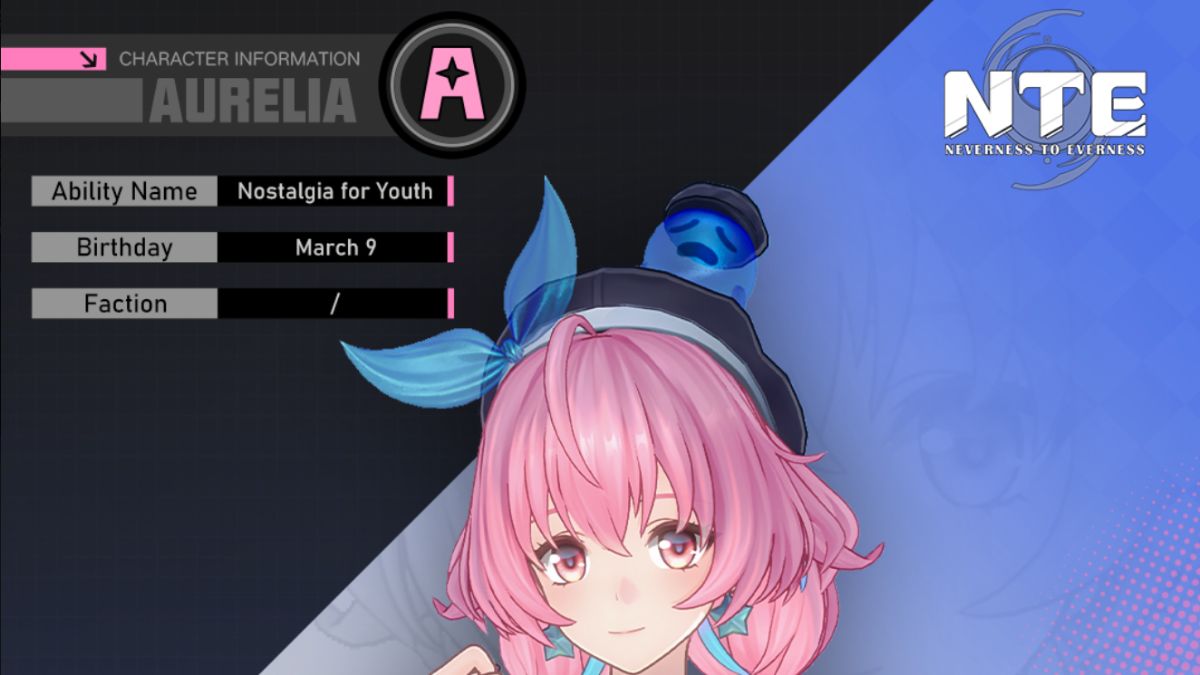
Aurelia Overview NTE
 | Overview | |
| Role | Under construction | |
| Element |  Psyche | |
| Faction | - | |
| Rarity | A-Rank | |
| Aurelia | ||
| Voice Actor (EN) | Voice Actor (JP) | |
| - | - | |
| Gender | Favorite Gift | Birthdate |
| Female | TBA | March 9 |
Aurelia Skills
Basics = Passive 1 = Passive 2 > Ultimate > Support Skill > Skill
| Type | Name | Description |
|---|---|---|
| Basic Attack | Legato | Sing smoothly and naturally! Aurelia wields her weapon and performs up to 4 consecutive attacks, dealing Psyche DMG. |
| Basic Attack | Staccato | Sing loudly and fully! Hold Dodge while moving to ride a jellyfish, sprinting at high speed for the duration. Generates a jellyfish blast at intervals when targets are nearby. Performs a special Dodge in this state, and Critical Riposte: Syncopation automatically fires four jellyfish blasts. Ends automatically when stamina drops low. |
| Basic Attack | Portamento | Sing clearly and beautifully! Aurelia wields her weapon in the air and plunges, dealing 1 instance of Psyche DMG to an area upon impact. |
| Critical Riposte | Syncopation | Triggers when casting Basic Attack: Legato after a Critical Dodge. Think you can handle my rhythm? Wields her weapon to deal 1 instance of Psyche DMG to an area and reduces Break. |
| Skill | Cadenza Aria | Transform the everyday into a rainbow melody and let it roar across the skyline. Deals 1 instance of AoE Psyche DMG and enters the Cadenza state for 12s. |
| Ultimate | Canon Chorus | Let's play the next verse together. Gathers nearby jellyfish, dealing 6 instances of AoE Psyche DMG and slightly pulling targets together. |
| Support Skill | Dissonance | A sharp commander never misses the perfect strike! Commands the jellyfish to strike, dealing 1 instance of area Psyche DMG on hit. |
Passives
| Name | Description |
|---|---|
| Harmonics | Nova Enhancement: Deals 3 instances of Psyche DMG to the target after their Nova status ends, each equal to 50% of ATK. |
| Crescendo | Increases Aurelia's ATK by 1% for 5s when a jellyfish blast hits a target, up to 10 stacks. |
Life Skills
| Name | Description |
|---|---|
| Perfect Fit | Level 1: Aurelia increases traffic by 1% for each Beverage tag on dishes. Level 2: Aurelia reduces ingredient consumption rate by 1%. Level 3: In Owner's Selection, customers leave additional tips when they leave. Level 4: Aurelia reduces ingredient consumption rate by 1%. Level 5: Aurelia increases traffic by 1.5% for every 2 Beverage tag on dishes |
Awakening and Resonance
| Condition | Name | Description |
|---|---|---|
| A1 | Futuristic Prelude | Increases Crit Rate by 15% while in the Cadenza state. |
| A2 | Unique Melody | Enters the Cadenza state for 5s after a successful Critical Dodge or casting Dissonance. Extends the duration by 5s if the state's already active. The Cadenza state lasts for up to 12s. |
| A3 | Trio Rest | Increases Canon Chorus DMG by 20% while in the Cadenza state. |
| A4 | Staff Gap | Increases Aurelia's DEF by 20% when casting Staccato. |
| A5 | Simple Melody | Increases Canon Chorus's Crit Rate by 15%. |
| A6 | Bygone Fugue | Increases the maximum stacks of Crescendo to 20. Grants 10 Crescendo stacks after casting Cadenza Aria. |
| Resonance | Universal Harmony | Increases the skill levels of Cappella, Cadenza Aria, and Canon Chorus by 1. |
| Resonance | Shared Melody | Increases all allies' Psyche DMG by 8% for 15s when entering the Cadenza state or when its duration is extended. Resets the duration when reapplied. |
How to Get Aurelia
You get Aurelia for free as a login reward for 3 days.
Best Arc (Weapons) for Aurelia
 Ready Ready | Base ATK: 570 Sub Stat: Crit Rate: 24% increases ATK by 15%. Increases Basic Attack and Critical Riposte damage by 15% for 15s when casting a Redirect Skill or Ultimate, up to 2 stacks. Grants a Left Tiger Talisman when casting Redirect Skill and a Right Tiger Talisman when casting Ultimate. Unlocks Commander Tiger Talisman if the wearer obtains the other type of talisman within 15s of gaining one. Arc: Commander Tiger Talisman — Increases the wearer's damage to Bosses by 10% for 10s. |
 Stellar Veil | Base ATK: 512 Sub Stat: ATK: 27.5% Increases the wearer's Psyche DMG by 12%. Increases Crit DMG dealt by 2.00% for 5s when dealing Psyche DMG, up to 10 stacks. Triggers at most once every 0.1s |
Ready-Ready is actually Aurelia's best-in-slot weapon despite being Nanally's signature weapon. This weapon gives CRIT Rate as its substat (24% at level 80). The base ATK is high at 570, making it one of the strongest stat choices available. The weapon skill provides three main benefits that all work perfectly for Aurelia:
- First, it increases your ATK by 15% permanently. This is a straightforward damage boost.
- Second, it increases Basic Attack and Critical Riposte damage by 15% for 15 seconds whenever you cast your skill or ultimate. This effect stacks up to two times for a total of 30% bonus damage. Since Aurelia's entire playstyle revolves around critical ripostes (Syncopation), this bonus applies to her main damage source.
- Third, using your skill grants a Left Tiger Talisman and using your ultimate grants a Right Tiger Talisman. If you obtain both talismans within 15 seconds of each other, you unlock Commander Tiger Talisman, which increases your damage against bosses by 10% for 10 seconds.
- Your standard rotation (Skill → Ultimate → attacks) automatically triggers this boss damage buff every rotation, making it incredibly valuable in boss fights.
Ready-Ready is the clear best option if you can obtain it. Stellar Veil is Aurelia's signature weapon and is obtainable for free as a login reward, which actually makes it more practical to have. This weapon gives ATK% as its substat instead of CRIT Rate. The weapon skill provides two benefits:
- First, it increases your Psyche damage by 12% permanently. Since all of Aurelia's attacks deal Psyche damage, this is a consistent damage boost.
- Second, whenever you deal Psyche damage, you gain 2% CRIT DMG for 5 seconds. This effect stacks up to 10 times for a total of 20% CRIT DMG, and triggers at most once every 0.1 seconds.
Aurelia attacks very frequently: her riding mode fires jellyfish blasts constantly, her critical riposte hits multiple times, and her ultimate deals six instances of damage. You reach maximum stacks (10) within a few seconds of starting your damage rotation and maintain them throughout fights. If you don't have Ready-Ready, Stellar Veil is an excellent free option that performs very close to the best-in-slot weapon.
Best Cartridges and Modules for Aurelia
 Devil's Blood Curse |  Lost Radiance |
    |     |
| 2 Pc Bonus: Psyche DMG +10% 4 Pc Bonus: DMG +18%, or +36% against enemies affected by Nova or Stain. | 2 PC Cosmos DMG +10% 4 Pc Bonus: Ignores 25% enemy DEF for 20s after casting Ultimate. Does not stack. |
Devil's Blood Curse is Aurelia's best-in-slot cartridge set if you have access to the Stain Esper Cycle in your team.
- The 2-piece set bonus gives you 10% Psyche damage, which applies to all of Aurelia's attacks since everything she does is Psyche damage.
- The 4-piece set bonus is where this set shines. It increases your damage by 18% baseline, which becomes 36% against enemies affected by Nova or Stain.
Stain is triggered by combining Psyche + Lakshana. As of launch, the best choice for Aurelia to trigger Stain is by including Hathor (Lakshana) in your team. This Cartridge has a small limitation, as the only way to trigger Nova right now is by having Daffodill in your team (only chaos character in NTE right now until Lacrimosa joins the roster). So if you don't have Daffodill, you will only be able to benefit from Stain reactions.
For me, Lost Radiance is the second-best option. I have seen people recommending Shadow Creed as well; however, I haven't tried it yet and will update this guide soon once I try it out. But just looking at the pieces for Shadow Creed, I feel the build path won't let you benefit from Aurelia's module specialisation. Also, the 4-Pc set bonus of Shadow Creed gives you a 25% attack boost, but doesn't have a Type 3 module, whereas Lost Radiance's build path for 4-pc bonus already has two Type 3 modules and can fit 2 more Type 3 module which already gives you 40% attack bonus. I will still update this section once I get to try out Shadow Creed.
Increases ATK by 10% for each Type III Module equipped.
Best Team Comp for Aurelia
Team 1
|  |  |  |
| Aurelia | Daffodill | Hathor | Haniel |
Team 2
|  | |  |
| Aurelia | Jiuyuan | Hathor | Zero |
Team 3
| | | |
| Aurelia | Daffodill | Hathor | Zero |
How to Play Aurelia in NTE?
Aurelia is an on-field main DPS. She needs extended field time and careful stamina management to maximize her damage output. Start each rotation by using your skill to activate Cadenza state, which increases all jellyfish blast damage by 70% for 12 seconds. Then hold dodge to enter Staccato mode—Aurelia rides her jellyfish at high speed while automatically firing jellyfish blasts at nearby enemies. This mode drains 5 stamina per second and cannot be activated if your stamina is below 40.
While riding, watch for enemy attacks. When an enemy is about to attack, press dodge to perform a special enhanced dodge that automatically fires four jellyfish projectiles. With Awakening 2 unlocked, your critical dodges and support skill automatically activate or extend Cadenza state, making your buff management much smoother. Awakening 1 gives you 15% CRIT Rate while in Cadenza state, which you'll maintain almost constantly with A2.
Use your ultimate on cooldown for burst damage and enemy grouping. Most of Aurelia's damage comes from her critical riposte, making her surprisingly cheap to invest in since you mainly need to level her basics. Her playstyle takes practice due to the timing required for special dodges and stamina management, but once mastered, she offers decent sustained damage.