Table of Contents
Gearing up your characters in Neverness to Everness is one of the most important things you can do to make them stronger. The system here uses Modules and Cartridges, and while it might look complicated at first, it's actually one of the more player-friendly gear systems out there. Everything is shown to you upfront, there's no hidden RNG on stat values, and once you understand how it all connects, it becomes pretty easy to figure out what your characters need. Here is your complete guide for Neverness to Everness Cartridges and Modules.
What Are Cartridges in Neverness to Everness?
Cartridges are the main gear pieces your characters wear. If you play Honkai: Star Rail, it's the Relics, or in Genshin Impact, it's the Artifacts. Each one comes with one Main Stat and four Sub Stats, and unlike some other games, you can actually see all four sub stats the moment you get a Cartridge. Moreover, the Main Stat and Sub Stats can overlap.
Cartridges come in three rarities: B (Blue), A (Pink), and S (Orange). Higher rarity means higher stat values.
How Cartridge Leveling Works
Leveling a Cartridge only boosts the Main Stat. Your Sub Stats stay exactly the same no matter how high you level it. Cartridges cap at +20, and every five levels, one Sub Stat becomes active. So you unlock sub stats at +5, +10, +15, and +20.
How to Get Cartridges in NTE
Cartridges are farmed using your stamina currency, Character Pixels. You farm them from the same place you grind for XP materials and Ascension mats, making it easy to stack your farming runs efficiently.
What Are Modules in Neverness to Everness?
Modules are smaller gear pieces that slot into your character's Console. Each Module comes with two fixed Main Stats (always Flat ATK and Flat HP) and four randomly rolled Sub Stats. Like Cartridges, all four Sub Stats are visible right away, and they unlock every five levels up to a cap of +20.
The big difference from Cartridges is that Modules have lower stat ranges, but they work together with your Cartridge to give you set bonuses, which is where the real power comes from.
Modules also come in three rarities (S, A, B) and three Types: II, III, and IV. The Type is based on how many blocks the Module takes up, and higher Types come with higher stats. Type IV will always have better numbers than Type II.
How to Get Modules in NTE
Modules are obtained through the Rewind feature, which you access via the button in the bottom left of your Console screen. This is essentially the module gacha system, and it uses Carrota Coins (Bronze, Silver, and Gold) as its currency. You earn these coins as you play through the game.
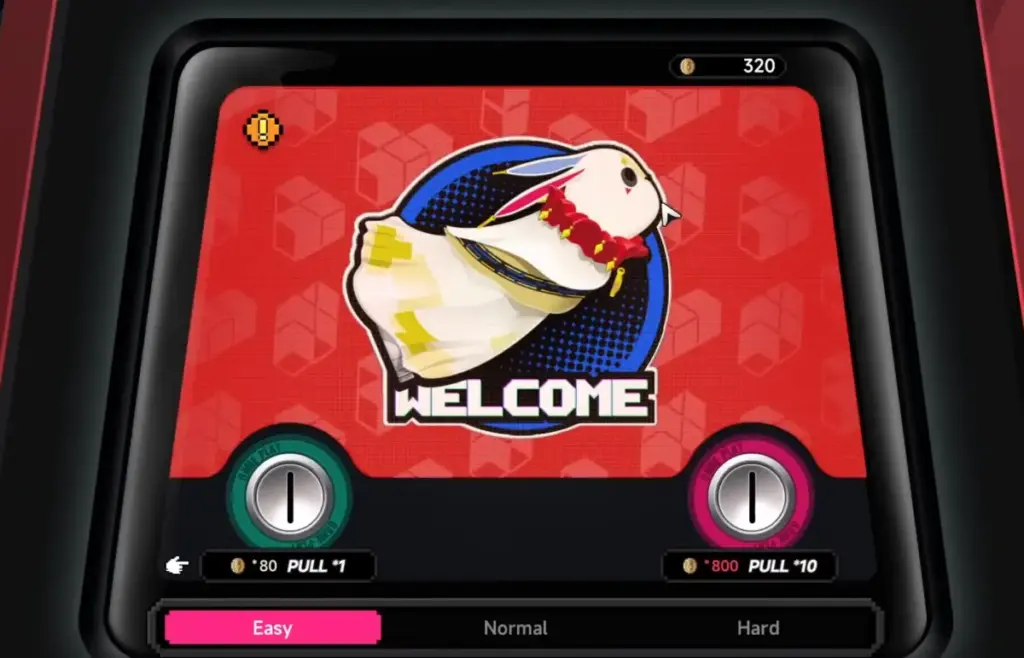
The difficulty of your pull determines the rarity of the Module you get:
| Pull Difficulty | Module Rarity |
|---|---|
| Easy | B Module |
| Normal | A Module |
| Hard | S Module |
A single pull costs 80 Carrota Coins, and a 10-pull costs 800 Carrota Coins. You can do random pulls and hope for what you need, or use the Module Selection feature to guarantee at least one specific piece in a 10-pull.
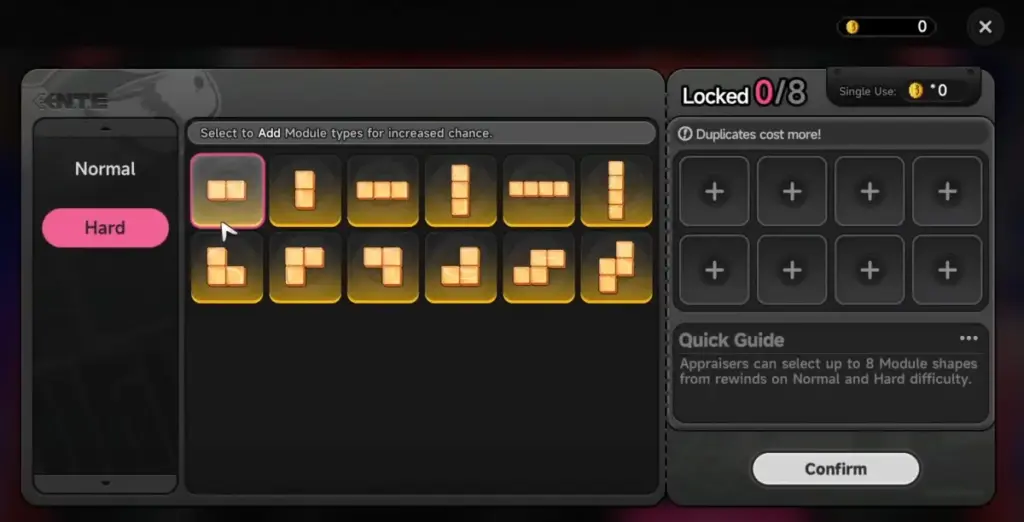
The more pieces you lock into your selection, the higher the cost. Adding duplicates to your selection costs significantly more, so be selective about what you target.
As you collect Modules, they go straight into your Module inventory, where you can then fit them into your Console like puzzle pieces.
What Is a Console in Neverness to Everness?
The Console is your character's gear board. You fit your Modules into this board, and the shape of each Module determines where it can go. Each character has their own unique Console layout.
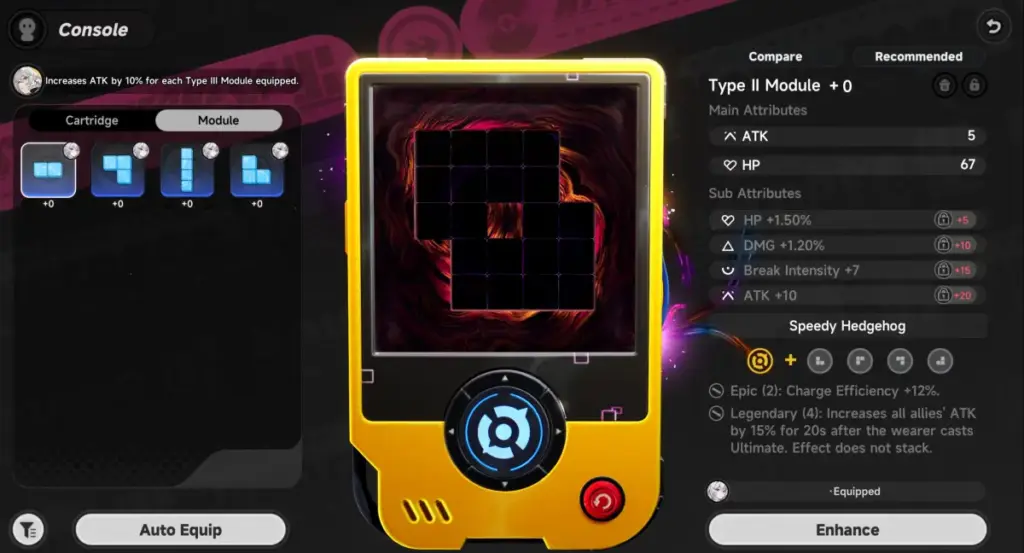
Here's the important part: equipping a specific Module Type on a character can give them bonus stats. For example, Nanally gets extra CRIT Rate when you equip her with Type II Modules. This means you can't just throw any Module on any character and call it a day. You need to know which type each character prefers.
Neverness to Everness Cartridge and Module Stats
Cartridge Main Stats
These are the possible Main Stats on a Cartridge and their ranges from +0 to +20 by rarity:
| Stat | B Cartridge | A Cartridge | S Cartridge |
|---|---|---|---|
| HP% | 4.5% – 22.5% | 6% – 30% | 7.5% – 37.5% |
| ATK% | 4.5% – 22.5% | 6% – 30% | 7.5% – 37.5% |
| DEF% | 6.3% – 31.5% | 8.4% – 42% | 10.5% – 52.5% |
| CRIT Rate | 3.6% – 18% | 4.8% – 24% | 6% – 30% |
| CRIT DMG | 7.2% – 36% | 9.6% – 48% | 12% – 60% |
| Anima DMG% | 4.5% – 22.5% | 6% – 30% | 7.5% – 37.5% |
| Chaos DMG% | 4.5% – 22.5% | 6% – 30% | 7.5% – 37.5% |
| Cosmos DMG% | 4.5% – 22.5% | 6% – 30% | 7.5% – 37.5% |
| Incantation DMG% | 4.5% – 22.5% | 6% – 30% | 7.5% – 37.5% |
| Lakshana DMG% | 4.5% – 22.5% | 6% – 30% | 7.5% – 37.5% |
| Psyche DMG% | 4.5% – 22.5% | 6% – 30% | 7.5% – 37.5% |
| Mental DMG% | 4.5% – 22.5% | 6% – 30% | 7.5% – 37.5% |
| Healing Bonus | 4.1% – 20.7% | 5.5% – 27.6% | 6.9% – 34.5% |
| Break Intensity | 21 – 108 | 28 – 144 | 36 – 180 |
| Cycle Intensity | 21 – 108 | 28 – 144 | 36 – 180 |
Cartridge Sub Stats
Sub Stats on Cartridges don't scale with level. What you see is what you get:
| Stat | B Cartridge | A Cartridge | S Cartridge |
|---|---|---|---|
| HP | 600 | 800 | 1000 |
| HP% | 7.5% | 10% | 12.5% |
| ATK | 48 | 64 | 80 |
| ATK% | 7.5% | 10% | 12.5% |
| DEF | 48 | 64 | 80 |
| DEF% | 10.5% | 14% | 17.5% |
| CRIT Rate | 6% | 8% | 10% |
| CRIT DMG | 12% | 16% | 20% |
| Universal DMG% | 6% | 8% | 10% |
| Break Intensity | 36 | 48 | 60 |
| Cycle Intensity | 36 | 48 | 60 |
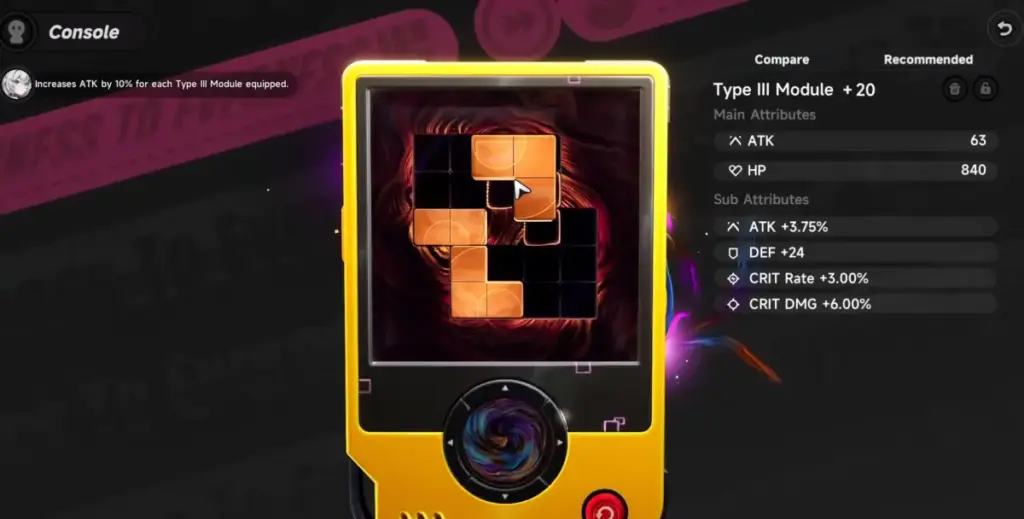
Module Main Stats
Modules always have Flat ATK and Flat HP as their Main Stats. The values scale by Type:
| Module | Stat | Type II | Type III | Type IV |
|---|---|---|---|---|
| B Module | HP | 67 – 336 | 100 – 504 | 134 – 672 |
| B Module | ATK | 5 – 25 | 7 – 38 | 10 – 50 |
| A Module | HP | 89 – 448 | 134 – 672 | 179 – 896 |
| A Module | ATK | 6 – 34 | 10 – 50 | 13 – 67 |
| S Module | HP | 112 – 560 | 168 – 840 | 224 – 1120 |
| S Module | ATK | 8 – 42 | 12 – 63 | 16 – 84 |
S Module Sub Stats
| Stat | Type II | Type III | Type IV |
|---|---|---|---|
| HP | 200 | 300 | 400 |
| HP% | 2.5% | 3.75% | 5% |
| ATK | 16 | 24 | 32 |
| ATK% | 2.5% | 3.75% | 5% |
| DEF | 16 | 24 | 32 |
| DEF% | 3.5% | 5.25% | 7.5% |
| CRIT Rate | 2% | 3% | 4% |
| CRIT DMG | 4% | 6% | 8% |
| Universal DMG% | 2% | 3% | 4% |
| Break Intensity | 12 | 18 | 24 |
| Cycle Intensity | 12 | 18 | 24 |
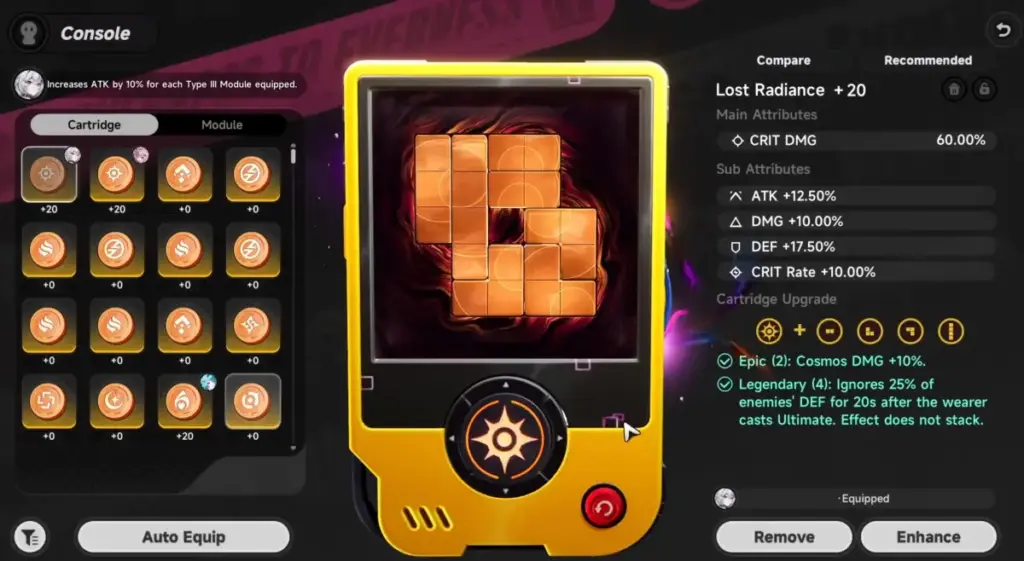
All Cartridge Sets in Neverness to Everness
Equipping four Modules into a Cartridge activates its set bonuses. Here's every Cartridge set currently in the game and what they do:
| Cartridge Set | 2-Piece Bonus | 4-Piece Bonus | Required Pieces |
|---|---|---|---|
 Crimson: Twin Butterflies | Incantation DMG +10% | ATK +6% per stack (up to 6) when nearby enemies take Incantation DMG. Lasts 10s each, works off-field. |     |
 Devil's Blood: Curse | Psyche DMG +10% | DMG +18%, or +36% against enemies affected by Nova or Stain. |    |
 Diabolos | Chaos DMG +10% | Ignores 12% Chaos RES. Ignores 24% for 20s after Nova or Scorch reactions. |  |
 Fireflies and the Forest | Anima DMG +10% | CRIT DMG +8% per stack (up to 7) when nearby enemies take Anima DMG. Lasts 10s, works off-field. |  |
 Kingdom's Guard | DEF +15% | Shields +20%. |  |
 Lost Radiance | Cosmos DMG +10% | Ignores 25% enemy DEF for 20s after casting Ultimate. Does not stack. |  |
 Quiet Manor | Mental DMG +10% | Mental DMG Bonus +12% per Basic Attack, up to 3 stacks. Lasts 6s each. | |
 Shadow Creed | ATK +10% | ATK +25% for 20s after casting a Skill. |  |
 Speedy Hedgehog | Charge Efficiency +12% | All allies get ATK +15% for 20s after the wearer casts Ultimate. Does not stack. | |
 Street Boxer | Lakshana DMG +10% | CRIT Chance +14%. Becomes +14% for 20s when team triggers Remora or Stain. | |
 Thea's Night Tavern | HP +10% | Healing Bonus +20%. | |
 Tiny Big Adventure | HP +10% | Max HP +4% per hit (up to 10 stacks, 10s each). Casting Ultimate instantly grants 10 stacks. | |
Always check which Module Type your character prefers before you build their Console. If you use the wrong type, you lose a free stat bonus, and that can affect how well they perform. Also, don’t stress about perfect Sub Stats early on. The game shows all the stats clearly, and they don’t change randomly. Just focus on getting the right set first, then improve it later.
Once you understand the Neverness to Everness Cartridges and Modules system, you will realize that gearing in this game is one of the more approachable experiences in the gacha genre. Give it some time and it will all click into place.